Nested Conditionals
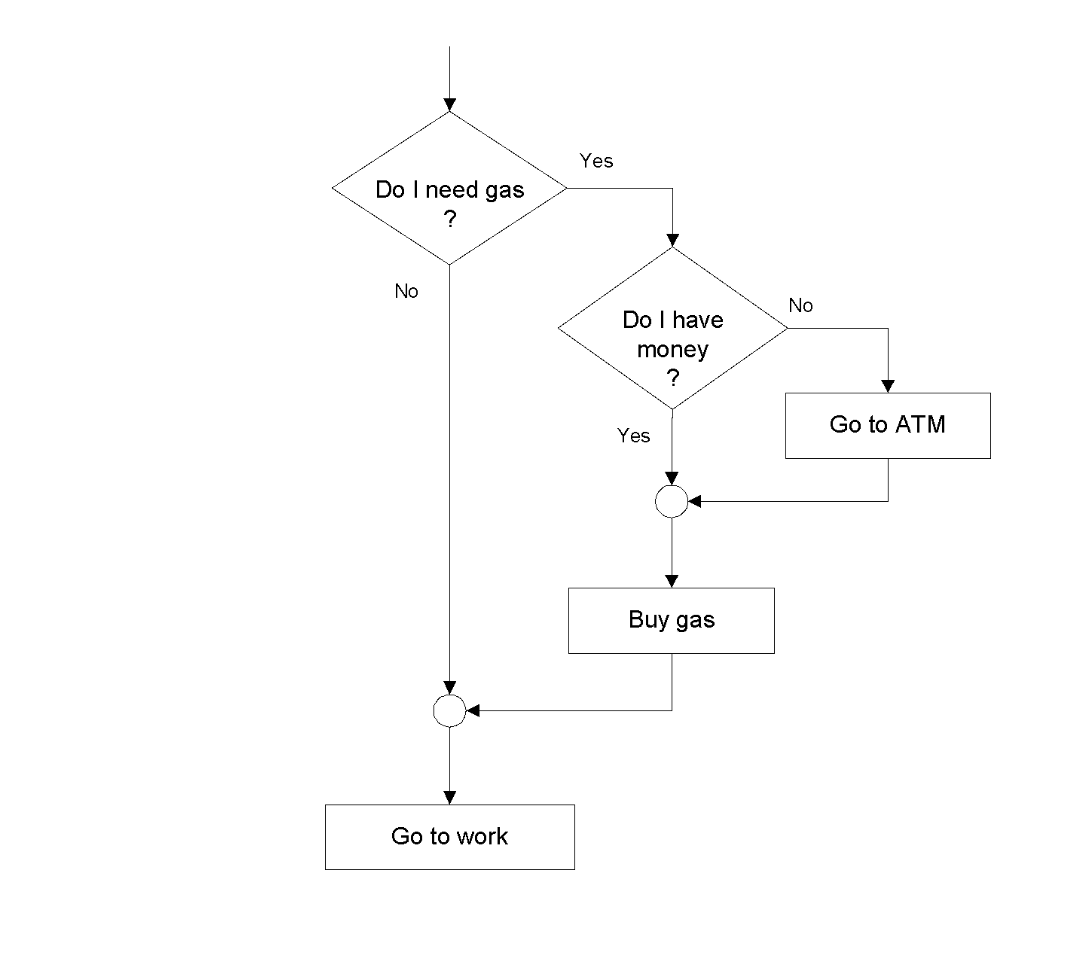
Sometimes making one decision leads to additional decisions. In this example, we’re only faced with the decision of whether to go to the ATM if we first discover that we need gas.

Visualized as a flowchart, this sequence of actions would look like this. If the answer to “do I need gas?” is Yes, we then have to ask the question, “Do I have money?” If the answer is Yes, we can just to buy gas, but if the answer is No, we have to go to the ATM first and then buy gas.
How do we express something like this in Python? If you look at the two general forms of an if-statement we have seen so far:
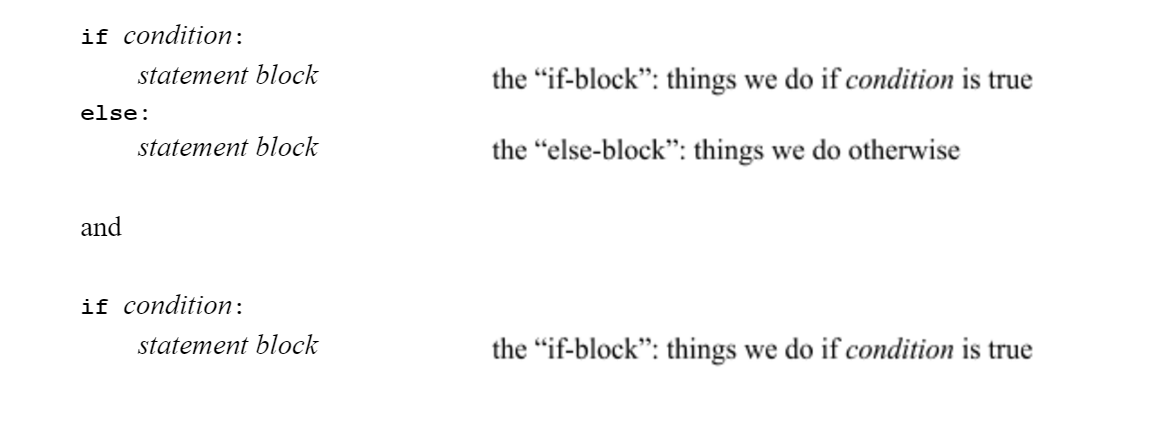
remember that where it says “statement block” that means any sequence of Python statements, indented by the same amount. Well, a conditional statement is a kind of statement, right? So, for example, consider the problem of Goldilocks, who needs to check whether the porridge is too hot, too cold, or just right. She might start out checking the temperature temp of a bowl of porridge like this:

Now, if it turns out that the porridge is not too hot, she needs to check something else, namely, is it too cold, or is it just right? That could be done with a statement like this:
So then we put them together.
Notice there are now two “indentation levels”, since the entire statement “if temp < 85...” must itself be indented to be part of the outer “else-block”.

A More Complex Example
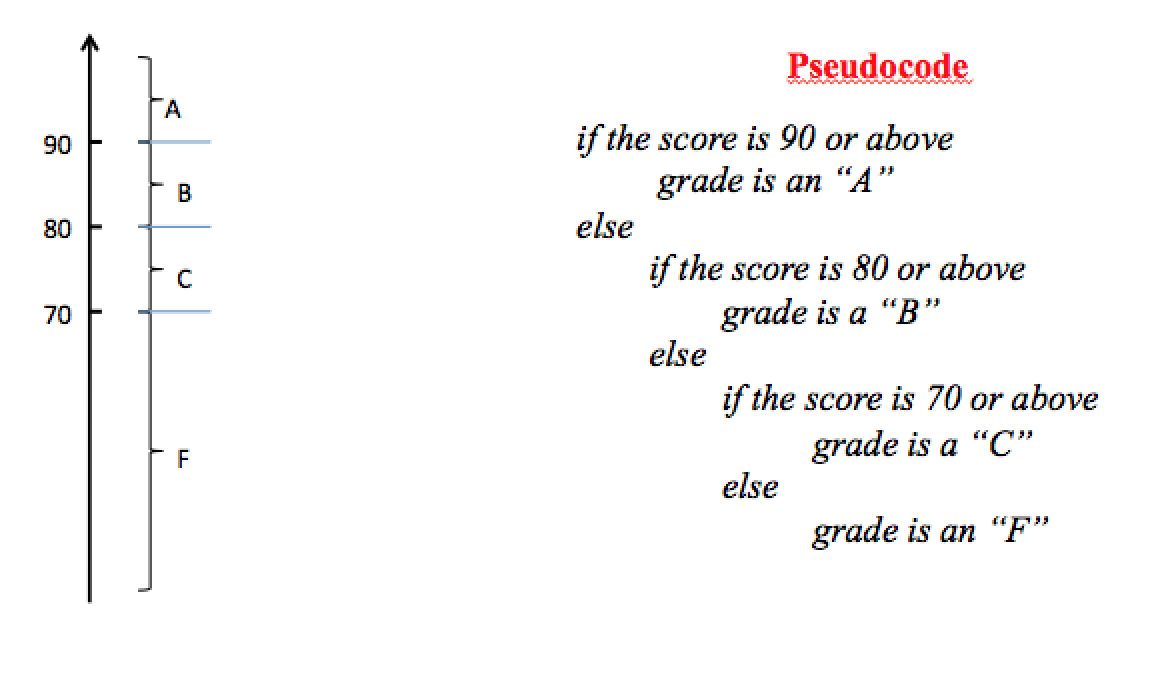
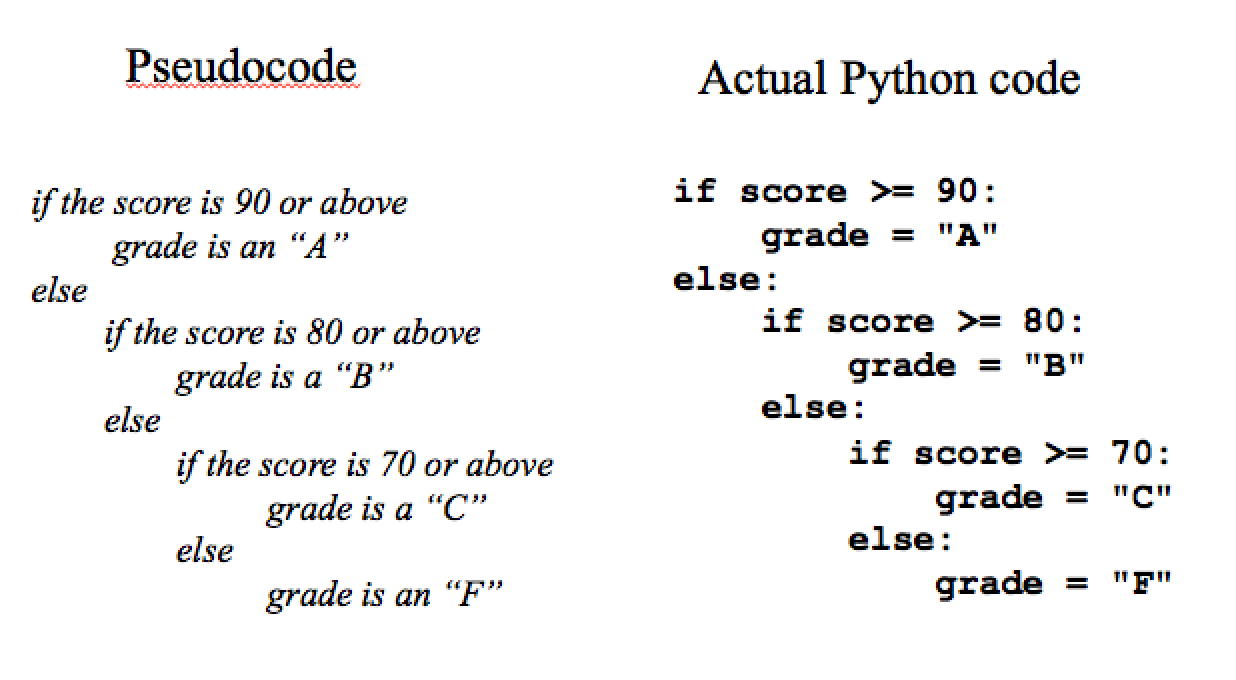
Here’s another example. Suppose we want to convert scores to letter grades, using the following scale: if the score is 90 or above it’s an “A”: otherwise, if the score is 80 or above it’s a “B”; otherwise if the score is 70 or above is’s a “C”; otherwise it’s an “F”.
One thing that helps to think about a problem like this is to first try to write out the decision algorithm in “pseudocode”. Pseudocode is a way of describing an algorithm informally that is sort of halfway between English and actual code, using indentation to group actions together. When writing pseudocode, we’re thinking about eventually writing actual code, so we try to think in terms of “if” and “else” blocks. It might look something like this:
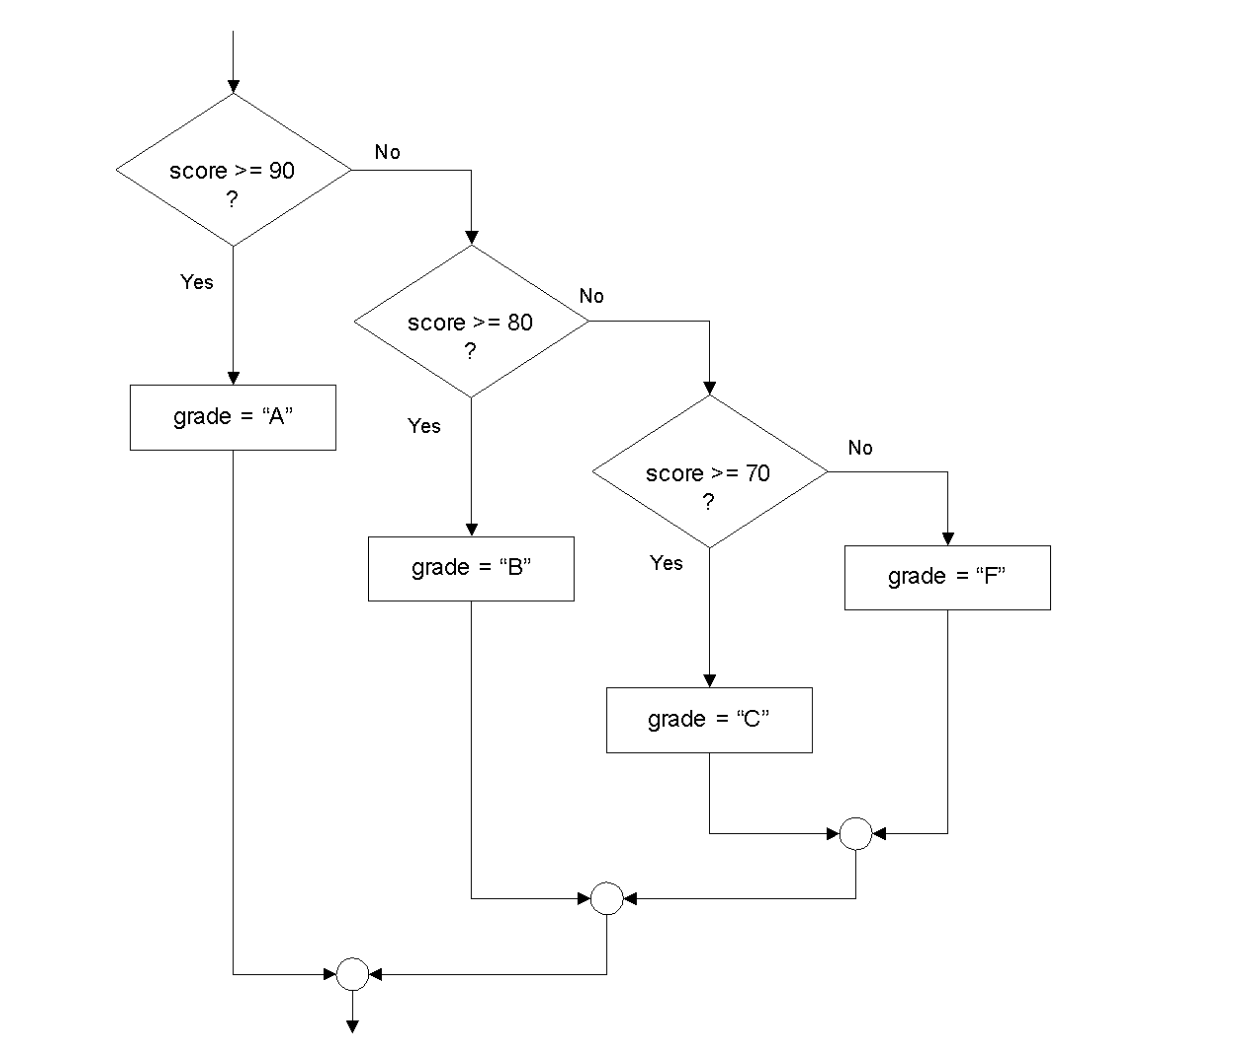
It is also possible to visualize the structure of the algorithm using a flowchart:
Once we have the structure organized, it is not difficult to translate the pseudocode outline into actual code. In particular, the use of indentation in Python was chosen precisely because it reflects the habits of programmers expressing algorithms in pseudocode.
There are now three indentation levels! Try it out for yourself:
Let’s trace through an example: Suppose the score is 75.
Is the score above 90? No, so we skip the outer “if” block and enter the outer “else” block:
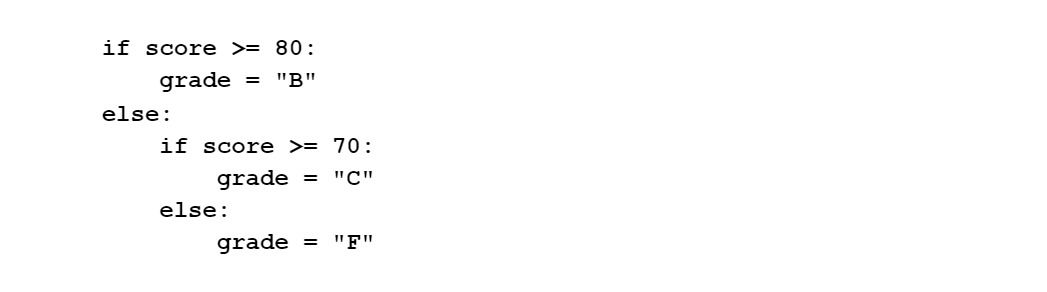
Is the grade above 80? No, so we skip the “if” block and enter the “else” block:

Is the grade above 70? Yes, so we execute the “if” block and assign a grade of “C”, skipping the else block. The grade ends up as a “C”.
The nesting of conditional statements here is important. The condition

only makes sense once we already know that the score is not above 90. For example what would happen if we tried writing the code like this?
Let’s see what happens to someone with a score of 95. 95 is greater than or equal to 90, so grade is set to “A”. Then, we continue on to the next “if” statement. Since 95 is greater than or equal to 80, we now set the grade to “B”. Next, we check that 95 is greater than or equal to 70, and then set the grade to “C”. Obviously that’s not what your instructor intended! Make sure to step through it above (try out Codelens)!
The elif Keyword
Sometimes, though not always, you find that a nested conditional is written so that immediately after an “else” there is another if, as we saw in the first example:
In situations like this when there is an ”else” right after an “if”, you can use a special keyword elif in order to “contract” the if and the else onto the same line. This is the third form of conditional statement. The possible advantage of using elif is that it reduces the number of indentation levels and makes the code easier to read. The Goldilocks example would look like this:
The letter grade example would look like this:
Notice that, if you compare the form above to the flowchart, we have not changed the logic. All we have done is use a more compact syntax to express the same nested conditions.
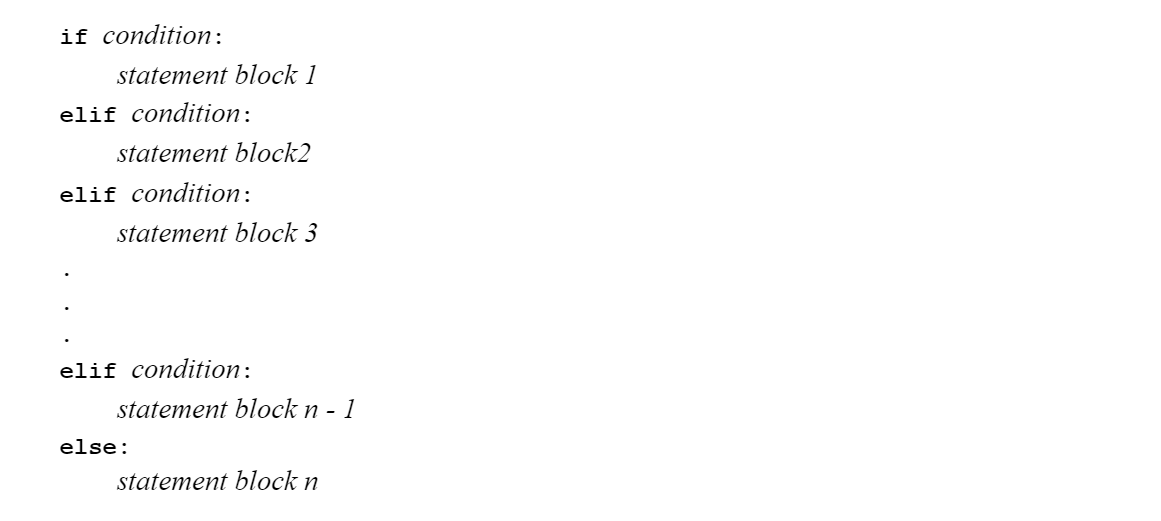
In this form of the conditional statement, you can have as many elif blocks as you want. There should normally be one else at the end. Here is the general syntax, showing n possible alternatives. Notice that one and only one of the n statement blocks will be executed. This is a good way to represent a number of mutually exclusive alternatives (such as assigning grades to scores.)
Reading code and understanding flow of control
When we read code as we did for the example of Section 1.2, notice that we don’t always read every line in the order it’s written, the way you do when you read a book. Instead, we follow the flow of control, that is, the order in which the statements are actually executed by the interpreter. When there is a conditional branch, we jump ahead to the statements to be executed, skipping over the branch that isn’t taken.
It’s important to be able to read code and trace what it is doing by hand, as we have just done. Why should we bother? Isn’t the whole point of writing code so that the interpreter can do it for us? Well, yes. However (although this may never have happened to you) what happens to most of us when we program is that we make mistakes. The interpreter will always do exactly what you tell it to do. So if your program isn’t doing what it is supposed to do, it is up to you, the wise human problem-solver, to figure out just what you told the interpreter to do and see if it is really what you wanted it to do.